

In Week 3 of the One Room Challenge, I focused on making a few DIY decor items. As with the first two weeks of the ORC, it was a struggle to work on the nursery to-do list. I managed to tackle a couple of my goals and learned how to wear the baby to help accomplish these goals while simultaneously snuggling.
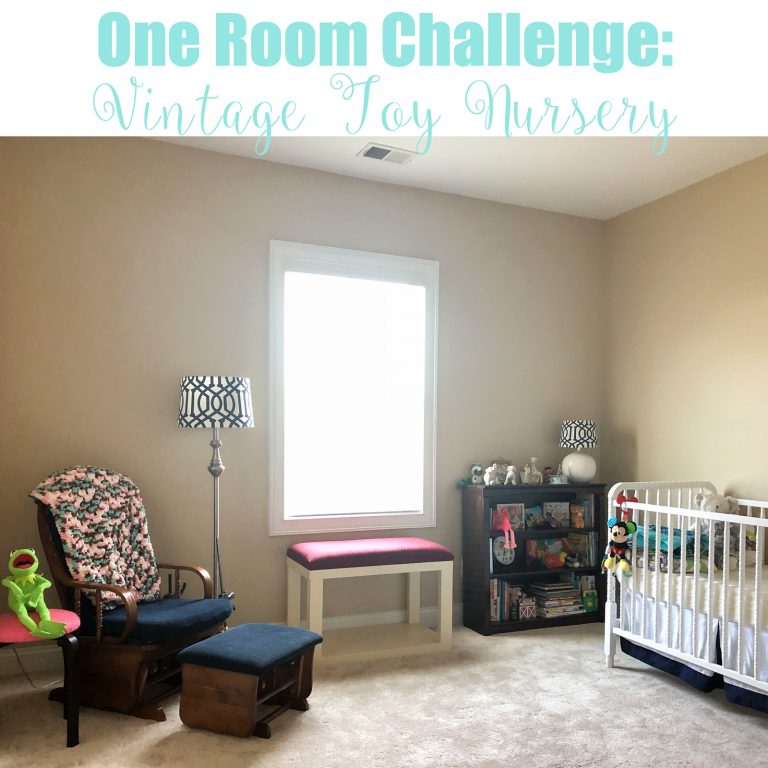

To quickly recap the project, I’m creating a gender neutral vintage toy themed nursery (with a few easily reversed girly touches) for our seven-week old daughter and any subsequent children. We moved into our house less than three months before she arrived, so our main focus for her bedroom (and the rest of the house!) was to create a functional space without worrying much about how it looked. Now that she’s here, I’m taking it from functional to fun!
Make
The main goal I set for myself this week was to make a few items for Little Miss’s bedroom. The tasks I hoped to accomplish were:
- Make DIY photo ledges – I didn’t make it out to Lowe’s for the wood, so this item remains undone. I also don’t have a clear vision for where to put them, so this particular project is on the backburner at this point.
- Arrange and hang the hairbow wall in her closet – Check! (but it took about 12 times as long as it should have, thanks to frequent interruptions)
- Add pink or navy ribbon trim to a plain white lampshade – Nope. I hadn’t thought much about how to attach the ribbon to the shade until I was about to begin…and then I realized I was missing the right adhesive.
- Make the DIY toy lamp (if I could locate the toys with which to fill it in our unpacked boxes) – Nope. Didn’t open a single box in search of said toys, so this item remains undone, too, and probably will for a while.
I was able to tackle a few additional items:
Spray
I bought this cross-stitch alphabet the day I found out I was expecting a tiny human. I’d seen it several months before and decided that if it was still at the antique store, I’d buy it. It was my lucky day. Not only was it still there, but the booth was having a 50% off sale! I never loved the yellow frame, which was also scratched, and decided to spray paint it navy.
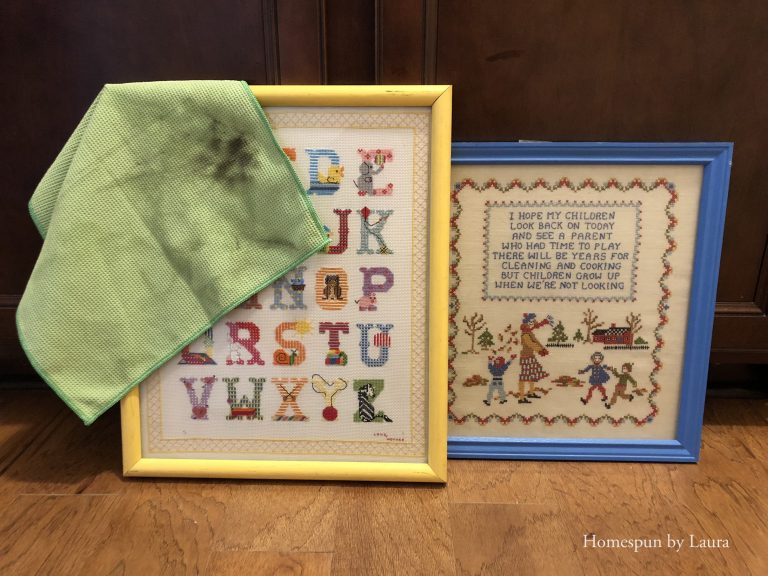

The second item that received a new coat of paint was the cross-stitch my mom made when my oldest brother was born. Now, 40 years later, it hangs in Little Miss’s room. I wanted it to coordinate better with the rest of the room and also thought the cross-stitch would stand out better against a navy frame than the bright blue.
I recruited the Mister to hang a few items, including the cross-stitch, but I’ve yet to pull off the paper protecting the glass. In the meantime a scary sideways lady stares at us every time we change a diaper.


The Mister dropped the screwdriver while hanging it and took a little chunk out of the frame. At least it was the wood and not the glass! The paper stays until I make it back downstairs for a final quick spray.
Glue
I pulled out the glue gun and some hot pink ribbon to add two fun girly touches to the room. Both are easily moved to another room with Little Miss in the event we ever use this room for a male child.
The first touch of pink will be on a lampshade. I realize before I got started that hot glue would probably show through the ribbon, so decided to hold off until I could get to the fabric store for some peel’n’stick adhesive. I went back and forth between pink and navy ribbon and in the end chose the pink. I preferred to use grosgrain for this project and since I could only find satin navy ribbon in by stash, I went with the pink grosgrain.
The second touch of pink is on the board I made for the hairbow wall in her closet. I didn’t have a clear vision for what the board would look like before I got started. While digging through my fabric stash, I found the navy gingham cafe curtains I made in a sewing class I took 9 years ago. I decided they were perfect to cover the foam memory board I salvaged from the garbage on move-out day my sophomore year of college…in 2006! It now has four layers on it from various changes I’ve made to it over the years.
The fabric had faded strangely from years of late afternoon sun exposure, but somehow it doesn’t really show on the finished board.
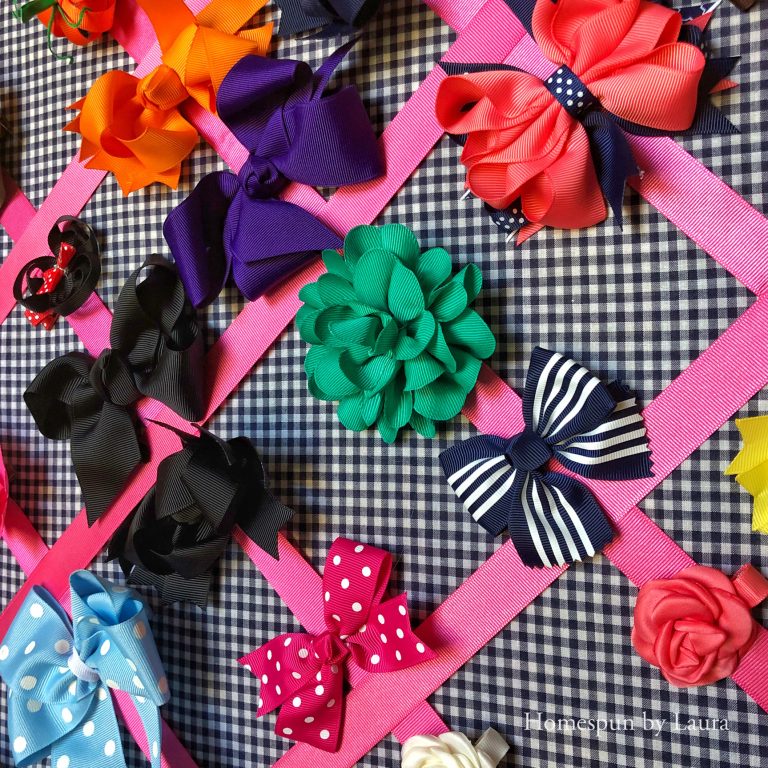
Our little lady has a birthday twin (our good friends’ daughter celebrated her eighth birthday the day our girl was born) who is sharing her old hairbows with us. They make up the majority of the collection.
Hairbow wall in closet
No little girl from the South can get away with not accumulating a ridiculous collection of hairbows. Ours is no exception to that rule! Already, before she reaches the end of her second month of life, she has more hairbows than I ever did – and less hair!
I made the board in such a way that we can use it as a memory/photo display board when she outgrows hairbows. This thing is like a cat – it has nine lives!
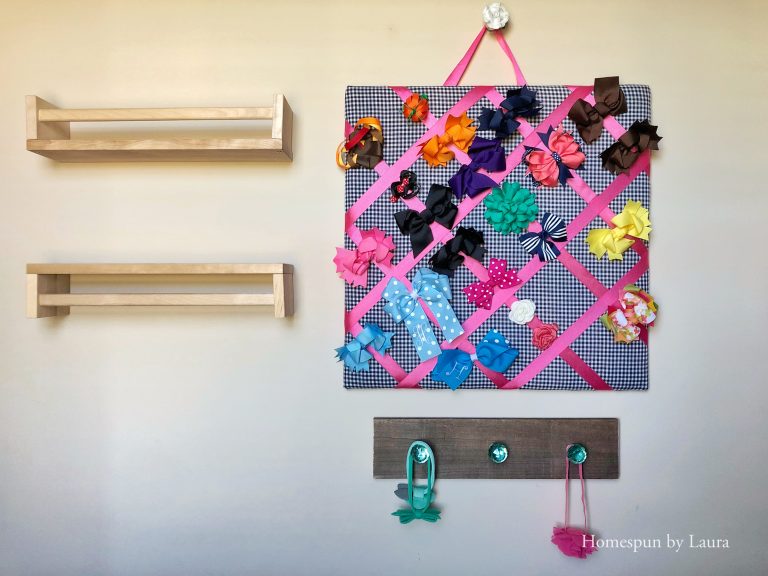
That college girl’s trash is now hanging on my baby girl’s wall twelve years later!
In addition to the board, we hung two Ikea spice racks – one upright and one upside down. I’m not 100% sure how I will use them, but they’re up! Headbands will likely hang from the upside down one, and we’ll see what winds up in the right-side up one.
A DIY project from last year’s Haven conference caps off the wall. Three knobs and a slat of wood came together to create the perfect place to hang baby girl’s next outfit each day, right down to the cute little headband.

Her head is finally starting to grow into headbands. For the first month of her life, there was only one that would fit her!
Goals for Next Week
I’ll keep plowing drifting through the to-do list in Week 4… In the meantime, take a look at the other great One Room Challenge projects!


Pretty much everything still remains on the to-do list:
- Paint and reupholster (or slipcover) glider – purchased for $15 at a neighbor’s yard sale years ago
- Paint and re-cover window bench; add pretty bins to store toys, books, etc.
- Hang art and photos, including art/pages from old children’s books I intend to get to a thrift store to purchase…
- Create an oversized piece of art to hang over crib
- Buy or DIY a ladder to hang blankets
Buy or DIY picture ledges- Find a pretty keepsake box to store special papers, hospital bracelets, etc.
- Possibly add a rug to the center of the room
- Replace light fixture with either a ceiling fan or prettier fixture
- Select paint color; paint wall (keep eyes open for rebate at Lowe’s – often offered around holidays like Columbus or Veterans’ Day)
- Create rubber ducky themed bathroom featuring souvenir rubber duckies and décor items left over from my college bathroom
- Use blank wall in closet to create hairbow storage/display
- Better organize the large but cluttered closet
- Use DIY Medal Display Shelf from old house as a curtain rod to hang old curtains from master bedroom at our old house
- Various other small DIY projects, including
- creating a vintage toy lamp,
- adding ribbon trim to lampshade,
- lengthening curtains (ceilings here are higher than at our old house),
- sewing a changing pad cover