Hello there! In reviewing some numbers on the blog recently, I realized that my Let Them Eat Cake post from soon after I began this blog in 2012 is by far my most popular post. Soon after that original post, I shared a few more in Let Them Eat Cake, Volume 2. But in the three years since I wrote those first two posts, many more cakes have been enjoyed by friends and family, and I’ll be sharing some of them here in Volume 3. Take a look; maybe you’ll get an idea for a cake or two of your own!
Giant Reese’s Cup Cake
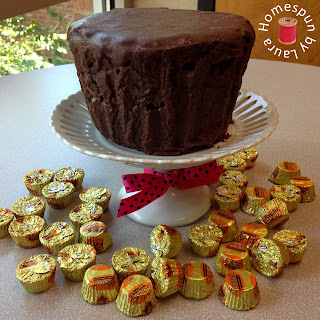
First up is this giant unwrapped Reese’s Cup that I made for a co-worker’s birthday. It was a chocolate cake with peanut butter cream filling, topped with chocolate ganache. To get the right shape, I used the bottom half of my giant cupcake pan, which looks suspiciously like a giant Miniature Reese’s cup. ‘Giant Miniature’ sounds like an oxymoron, but I say that because the regular Reese’s cup is more wide and flat while the mini Reese’s cup is kind of tall and fat, like this one.
I made a filling for the cake by mixing peanut butter with buttercream icing, then poured ganache over the top of the cake, letting it run down the sides before it set. To complete the theme, I scattered a few handfuls of wrapped mini Reese’s cups around the cake pedestal.
‘Giant Miniature Reese’s Cup Cake’
Cupcake Rose Bouquet
A few weeks later, I provided a bouquet of cupcake flowers for a wedding shower my mom was hosting for a neighbor’s daughter. I got the idea from a post I found on Pinterest at the time. I found the pretty plant pot at Hobby Lobby (I think), washed it, and filled it with a giant Styrofoam ball that fit perfectly inside it to serve as an anchor for the cupcakes.
 |
| Cupcake bouquet in progress |
I made the cupcakes at home and transported them to my hometown a little over an hour away in a cupcake carrier, then assembled the bouquet at the shower location (which happened to be held at the same place we had our wedding reception!).
 |
| It’s starting to come together |
The ladies loved the theme, and the cupcakes tasted pretty good, too.
 |
| The addition of tissue paper leaves completes it! |
 |
| The rest of the cupcakes went on display on a cake stand |
The ‘Suitcake’
The next month, there was a gathering for the Mister and his grandmother’s birthdays, which are a day apart. I wanted to make a cake that was suited to a lady in her seventies and a man in his twenties, which is a challenging task. I finally settled on a common interest that I could work with: traveling. Since his grandfather retired a few years ago, the Mister’s grandparents have traveled all over the US and to a few countries abroad. The Mister and I also enjoy traveling and have been to many US states and a few countries together.
I thought of the scene in “It’s a Wonderful Life” where George Bailey is describing the suitcase he wants for the trip he’s been saving for, one that’s big enough to hold labels from all the countries he plans to visit. I thought of a few places that the Mister and I have traveled and a few where his grandparents have traveled, and made big souvenir ‘stickers’ for them out of homemade marshmallow fondantto put on the top of my suitcase cake.
 |
| Plain cake with the piece that would become the handle |
To turn the cake into a suitcase, I formed a piece of fondant into about a 1”x 8” box and attached it to one of the long sides of the cake with piping gel, which serves as a kind of edible glue, to create a handle. I used a toothpick to score all the way around the cake to create the line where the suitcase would open. The last step here was to create and attach a little lock underneath the handle.
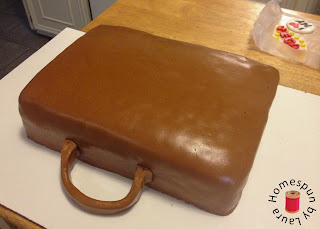 |
| It’s starting to look like a suitcase… |
Once the thing had been made into a plain brown suitcase, I attached the souvenir stickers to the cake, again using piping gel. The last-minute addition of a luggage tag that doubled as a place to write ‘happy birthday’ finished it off.
And the finished product was a suitcase cake, or ‘suitcake.’
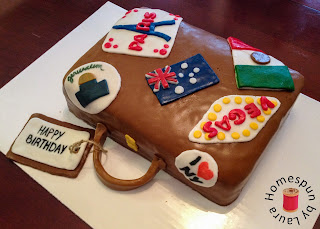 |
| Suitcase cake |
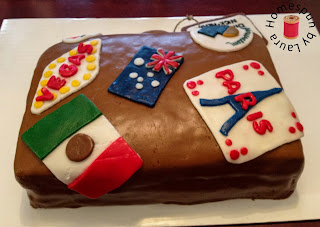 |
| Suitcase cake again |
Mickey Birthday Cake
Our good friends’ daughter turned two the following month, and I had the privilege of making her cake again. The theme for year #2 was Mickey Mouse, so I tackled the challenge of making an icing Mickey. It was easier than I thought, using Frozen Buttercream Transfer (FBT).
I printed out a picture I found online of Mickey holding a present, taped it to a cutting board that will fit in our freezer, then covered the board with wax paper. Starting with black icing and a tiny tip, I traced Mickey’s outline. Next, I started filling him in, beginning with the smaller items in the foreground first (eyes, dots on his shorts, etc.) before moving on to the background sections (red shorts, tan face, etc.) and finishing with the white background in a kind of starburst shape. For more detailed how-to on FBT, click here.
 |
| Frozen Buttercream Transfer in progress |
I put him in the freezer and let him harden for a few hours until he was stiff enough that the wax paper would pull off without the icing sticking to it. While he was freezing, I baked and iced the cake with its base layer of bright yellow icing. And did a ton of dishes. Then, when Mickey was ready, I took him out of the freezer, removed the tape that was attaching the wax paper to the cutting board, then very carefully flipped him over onto the cake.
 |
| Mickey cake in progress |
To finish it off, I did my best version of Disney’s handwriting and wrote ‘happy birthday,’ which went a little long, so I had to adjust the border a bit to make it fit.
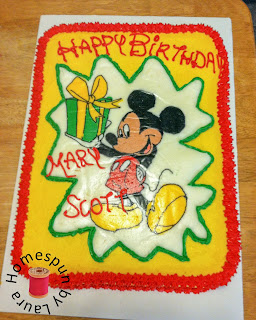 |
| Mickey cake |
Clemson Cakes
My family is comprised of Clemson fans, so it would make sense that I’ve made several cakes with a Clemson theme over the years.
In addition to having a birthday close to his grandmother’s, the Mister’s birthday falls a week before my mom’s. Unlike my family full of tigers, the Mister’s has a few USC (that’s the Gamecocks, not the Trojans!) fans sprinkled in it. So when we met for dinner to celebrate both the Mister’s and my mom’s birthdays that year, I made a ‘cake divided.’
 |
| Clemson-Carolina house divided cake |
In Volume 1, I shared the Clemson Tiger Paw cake I made for my brother’s birthday, which falls right in the middle of football season and is generally observed at a tailgate on the beautiful Clemson campus. For the next year’s cake, I decided to go with more of a football theme by making a Clemson jersey cake.
I started with an 11×14 rectangle cake and trimmed the sides down to create sleeves and a neck hole. The decoration was simple: a few letters and a paw were all it needed.
 |
| Clemson football jersey cake |
Tuxedo Cake
A couple months later, I was asked by a lady at work to make a groom’s cake for her son’s wedding reception.
He wanted a brown fondant tuxedo cake with both Wofford College and USC represented on it. A Wofford lapel pin and a pocket square decorated with a USC palmetto tree fulfilled this request. I used the same Frozen Buttercream Transfer that I used to make Mickey to create these two designs.
 |
| Icing South Carolina pocket square |
 |
| Pretty bow tie, buttons, and big icing lapel pin |
In addition, the wedding was five days before Christmas, so he also wanted some sort of a Christmas decoration added to it. Poinsettias seemed to me to be the obvious solution to that request, so I made some out of royal icing and chose the best six to place at the front of the cake.
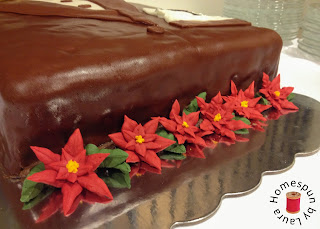 |
| Royal icing poinsettias |
To keep the bow tie nice and fluffy, I made it a couple days in advance and let it dry overnight with a few pieces of wadded up paper towel to keep it from falling flat while it dried, similar to this one.
This was the biggest and most involved cake I’d ever made for someone else, and I was so nervous as we got on the interstate and drove downtown to deliver it. I held it in my lap the whole way to make sure it didn’t slide anywhere. Once we arrived at the reception site, there was a flight of stairs to go down, and since I was wearing heels and am not very surefooted on stairs to begin with, the Mister took over and carried it down. I was sweating until the cake was safely placed on its table.
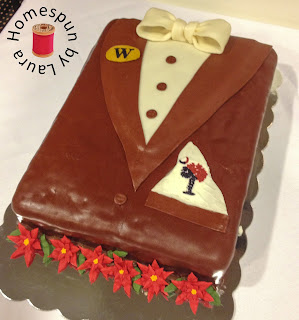 |
| Tuxedo groom’s cake |
Oreo Cake
At some point a few years ago, I was telling my sister-in-law about a cake I had made that looked like an Oreo. I don’t remember what occasion I made it for, but I do remember that as soon as I told her about it, she was very interested in having one. So the next spring when we went to visit her and my brother for the weekend, I made an Oreo cake to take with us.
Not only did it look like an Oreo on the outside, it also had an Oreo filling. It was two layers of chocolate cake divided by a sinful layer of filling: white vanilla buttercream icing with crushed Oreo pieces mixed in. This layer of white filling made the thing look like an Oreo on the inside, too, when it was cut into slices.
It’s hard to turn white vanilla icing into true black icing, so the cake is really a very dark gray, but that also makes it easier to see the design. To create the design, I stared at an Oreo for a really long time and picked the most important lines to reproduce on the top of the cake.
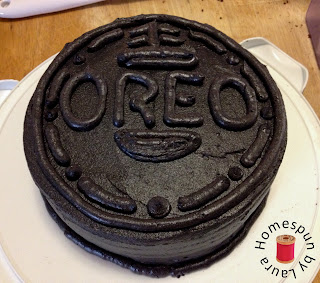 |
| A tasty Oreo cake! |
The four of us enjoyed dessert at each meal that weekend, but since part of the purpose of the trip was to run a 5k, I think we all earned at least one piece!
Homemade Strawberry Cake
When strawberry season rolled around in April, I decided to use some of the berries I picked to make a cake from scratch. I didn’t have a recipe already, so I searched online until I found the one I wanted. It was so good, I made it twice!
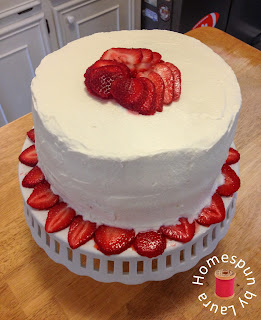 |
| Homemade strawberry cake embellished with fresh strawberries |
I searched for that recipe and can’t find it anywhere. It’s possible that this is the one, but I’m not certain. I fully intend to organize my recipes one day in the near future, and I hope I come across it then. Now that I’m thinking about it, I really want to make it again!
Beach Cakes
The last two cakes I’ll share today are very similar. One is from family vacation in St. Thomas with the Mister’s family, which happened to coincide with his sister’s 30th birthday.
I took with me the candy pieces and a plastic mold to make the shells, along with a few tiny edible pearl pieces so I could make one of the shells contain a pearl (even though none of them were actually oysters). His mom found a small sand bucket and packed it in her checked baggage so we could use it for the birthday cake.
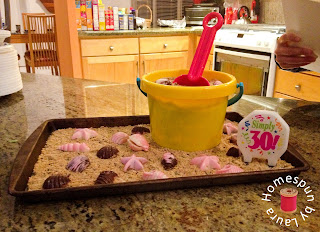 |
| Beach cake #1 |
This cake was a group effort; my mother-in-law baked it, and the Mister and I worked together to assemble it. We were able to get our hands on some Nilla wafers, which the Mister crushed in a bowl to create the ‘sand’ while I made chocolate shells out of the materials I brought with me.
The second beach cake is actually the second homemade strawberry cake I made. Instead of decorating it as a strawberry cake, I cut it into tiny layers, which I put into another sand bucket, alternating with layers of icing and sliced strawberries. Nilla wafer sand (with a few crushed oreos mixed in) and chocolate shells completed the cake, which we shared with my extended family on our annual beach trip.
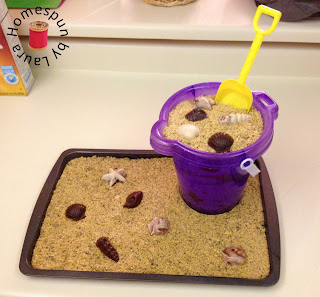 |
| Beach cake #2 |
Of course I can’t take credit for this idea; it came from either the internet or a magazine, and it’s a fun, easy way to make a cute, beachy cake!
Thanks for tuning in to this edition of Let Them Eat Cake! I have two more years’ worth of delicious cakes (and big cookies, too!) to share, so there is plenty of content for Volume 4…
Laura


